This blog series is a part of the write-up assignments of my Real-Time Game Rendering class in the Master of Entertainment Arts & Engineering program at University of Utah. The series will focus on C++, Direct3D 11 API and HLSL.
In this post, I will talk about how I enable alpha blending for the effects and how they are differentiated from the normal draw calls in my current engine system
Alpha Blending Effect

With the effect format that we set up a long time ago, it is really easy to modify an effect to enable alpha blending. However, a dependent draw call might depend on some more criteria other than just alpha blending. What we can do is adding the check into our effect builder, and allow it to set the dependent bit. Right now, I am just checking whether the alpha blending is enabled or not.

Now every time the game thread submits new meshes to the rendering thread, the graphics system will check the draw call type and encode it accordingly.

Render Commands Sorting
For our independent draw calls, we’re just gonna use the same sorting scheme (effect -> material -> depth -> mesh). However, it’s a different story for the dependent draw calls. The dependent draw calls demand strict drawing order from the back to the front, otherwise, the alpha-blending result won’t be correct. To achieve this, I made separate encoding functions for each type.


You can see that the dependent draw call has a larger value in the enum, which guarantees that it will be sorted after the independent draw calls. After the render commands are arranged and sorted correctly, we can easily call the same sorting function as before.
Results

You can clearly see the blending effects between the meshes in the front and the meshes in the back. The blending results look correct, green plus red turns into yellow, and blue plus red turns into purple. Now let’s take a look at the rendering order and see if it is doing what we expected.
Note how the independent draw calls (solid objects) are being drawn in groups of effects and materials, and also from front to back. While the meshes with alpha blending enabled are being drawn from back to front, and the overlapping fragments changed color when a new mesh is being drawn onto it!
Depth Test/Writing
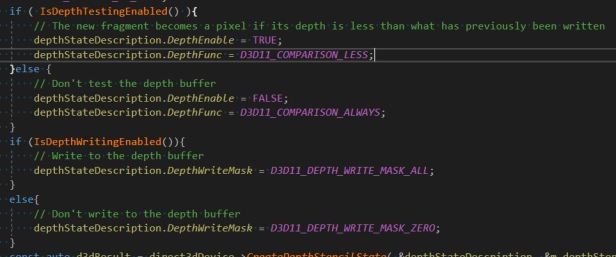
Currently, in my engine’s render state, two flags are actually getting set when I enable depth buffering. The two flags are depth testing and depth writing

However, do we really need both settings when rendering alpha-enabled object? Well, we definitely still need to do the depth test, otherwise, a transparent object that should’ve been blocked by an opaque object will now suddenly be rendered in front of it! But I could essentially disable depth-writing for the alpha-enabled objects since I ordered them to be rendered from back to front. Generally speaking, the later draw calls for transparent objects should always be in front of the previous ones. Therefore, I don’t really need to write into the depth buffer anymore, but I could just check against the depths of the opaque objects. To achieve this, I need to modify my effect format, render state class, and the builder program.

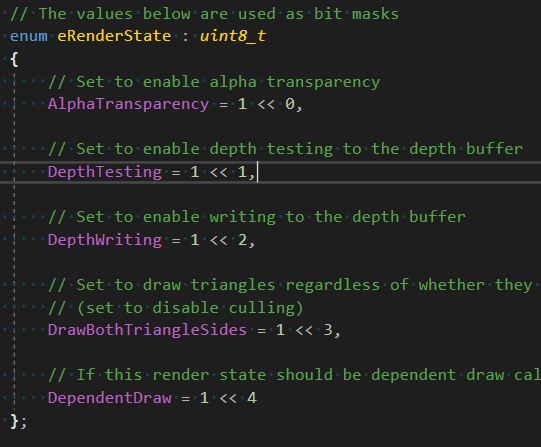
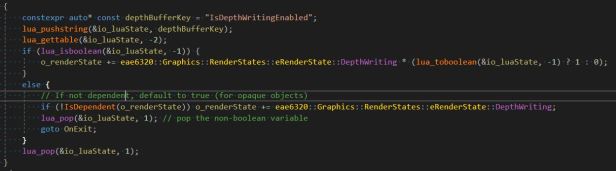
The builder application will respect the settings in the Lua format, but try to make a reasonable default assumption if it is not given the settings. The depth testing bit will be defaulted to true, while an object with alpha blending enabled will have the depth writing bit default to false to save some resources!
Different Blend Modes
There are multiple different blend modes that we can set in our render target blend descriptions apart from the basic alpha blending. We can set multiple render target blend description with different blend operations and the blend factors to achieve different blending effects.

To enable different blend modes, the whole building scheme and render state setup need to be revisited. Instead of only using a one-bit flag to specify whether alpha transparency is enabled or not, I am using two bits to specify the alpha blending modes. When initializing the render state, I support different presets of blending description according to different blend modes.


As you can see, I am supporting two extra special blend modes right now, one for additive (linear dodge), and one for multiplicative. Generally speaking, since the additive is adding two layers directly together and creating a brighter effect while multiplying the layers together gives a darkening (since we will only be multiplying by numbers smaller than 1.0) effect.